How to Draw On Eyebrows: A Step-by-Step Guide

When it comes to creating the perfect brow, mapping and drawing on your eyebrows is essential for a flawless, symmetrical look. Whether you're enhancing sparse areas or creating a bold new shape, following a precise technique ensures the best results.
In this guide, we’ll walk you through the eyebrow mapping process using The Brow Technicians Retractable Eyebrow Pencil—a waterproof, smudge-proof, and long-lasting solution. This pencil offers 24-hour hold, making it perfect for those with oily skin or anyone seeking all-day brows without touch-ups.
Step-by-Step Eyebrow Mapping with a Pencil
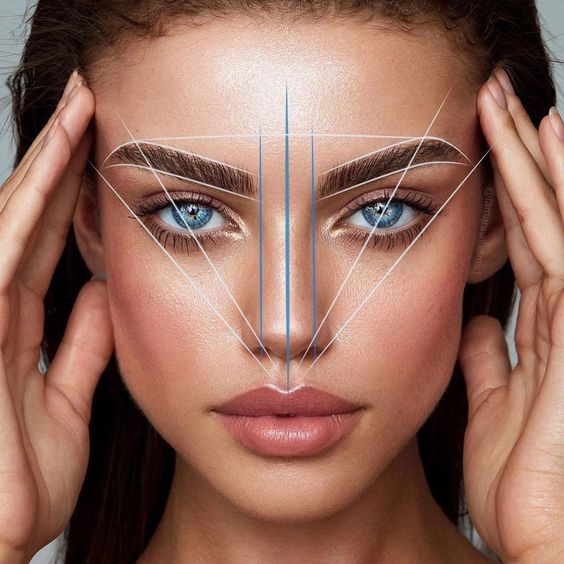
Eyebrow mapping helps define where your brows should start, arch, and end to best suit your face shape. Here’s how to map and draw your eyebrows using an eyebrow pencil:
Step 1: Determine the Start of the Brow
- Pencil Placement: Hold your pencil vertically against the side of your nose, aligning it with the inner corner of your eye.
Mark the Spot: Where the pencil meets your brow line is where your brow should begin. Mark this spot lightly with the pencil.
This ensures your brows start at the most flattering point, framing your face symmetrically.
Step 2: Find Your Arch
- Pencil Placement: Now, angle the pencil from the side of your nose, passing over the centre of your iris (the coloured part of your eye).
- Mark the Spot: Where the pencil intersects with your brow is where the highest point of your arch should be. Lightly mark this point to guide your shape.
Creating a well-placed arch gives your face a lifted, youthful appearance.
Step 3: Define the End of the Brow
- Pencil Placement: Angle the pencil from the side of your nose to the outer corner of your eye.
- Mark the Spot: The spot where the pencil meets your brow line marks the natural end of your eyebrow. Add a light mark here.
Ending your brows at this point helps avoid overextending and keeps your look balanced.
Step 4: Connect the Dots
Once you’ve made these three key points, it’s time to connect them to form your ideal brow shape. Using The Brow Technicians Waterproof Pencil, gently outline the bottom and top of your brow, connecting the start, arch, and end points.
Step 5: Fill In Your Brows
Using the pencil’s angled tip, fill in your brows with light, hair-like strokes. Focus on sparse areas, and build the intensity gradually to create a natural, defined look. The pencils, waterproof and smudge-proof formula ensures your brows stay intact throughout the day, even in humid conditions or for those with oily skin.
Benefits of Using The Brow Technicians Retractable Eyebrow Pencil
1. Waterproof: Perfect for long-lasting wear, this pencil stays put, rain or shine.
2. Smudge-Proof: No need to worry about fading or smudging during the day.
3. 24-Hour Hold: Enjoy bold, beautiful brows that last from morning until night.
4. Ideal for Oily Skin: Its formula is designed to resist slipping, making it suitable for those with oily or combination skin types.
Tips for a Perfect Brow Finish
- Use a Spoolie: After filling in your brows, use a spoolie brush to blend and soften the colour, creating a more natural look.
- Set Your Brows: For even longer-lasting results, finish with The Brow Technicians Brow Set Gel to lock the shape and colour in place.
Final Thoughts
With the right tools and techniques, drawing on flawless eyebrows is simple. By following these eyebrow mapping steps and using The Brow Technicians Waterproof Pencil, you’ll achieve well-defined, smudge-proof, and waterproof brows that last all day long. Whether you're aiming for a natural or bold look, this pencil ensures precision and durability, making it an essential addition to your makeup routine.
Check out The Brow Technicians Waterproof Pencil to perfect your brows today!
https://thebrowtechnicians.com/collections/individualproducts/products/retractable-eyebrow-pencil-waterproof

